
Here is a recap of the process leading up to the party:
If you weren't already aware, I spent a good deal of time planning and daydreaming about this party. This blog was my journal of sorts to catalogue all of my ideas. It started back in May when I rented a local park picnic shelter, and wrote Sixteen Weeks and Counting. Summer came and I became a little distracted with all the fun summer activities, but I always kept an eye out for inspiration on Pinterest, and wherever else as mentioned in All Over the Place. Finally in early August I lost my fondant v-card and made some homemade marshmallow fondant and a practice cake on Conquering Fondant. With less than 3 weeks left to go, I really started listing everything I needed to get done on First Birthday Party Organization. Finally, with 10 days left to go, I showed off the birthday outfit I made as well as a second practice cake on More Birthday Odds and Ends.
 The week before the party was definitely hectic - hence the blog neglect. I was also trying to get everything ready for the family/birthday portraits 2 days after the party. My Amazon account was exercised rather heavily. I would arrive home sometimes to a stack of several (beautiful) brown boxes with smiles on them. They really made this shop-a-holic's heart skip a beat each time I saw them. Of course, now that it is all over, spending is being cut back big time until the holidays roll around.
 As I made Baby Boo's party outfit, and searched for party supplies, I quickly realized something; My beloved color scheme was not going to work. The pretty colors I had planned on are not exactly staples in the party supply business, and I wasn't going to shell out crazy cash for custom stuff. I had to modify it and go with oranges versus peaches and corals.

At least this way fabrics, tissue paper, cups, plates, napkins, etc. were all readily available in the colors I wanted. I ordered my tissue paper in bulk online for the decorative pom poms, and they arrived midweek before the party. It was nice to be able to get that done before the hustle and bustle of the food and cake prep on the actual party weekend.
I got the idea for these from Martha Stewart's website, though the final product was a little different than hers. Here is the process for making pom poms:

- Stack 8 layers of 20"x30" tissue paper together.
- Along the shorter end, fold up a 1.5"-2" flap.
- Continue to make accordion folds of the same size along the whole stack of tissue paper.
- Cut the ends of the folded strip with a rounded edge.
- OR (instead of 4) cut a sharp edge on the sides - I prefer this one.
- Tie a string or hanging wire around the middle of the paper. To fully assemble the pom pom, pull apart the layers one by one until all are separate and poofed.

The left one has the rounded corners and the right one has the sharp corners.
I liked the sharp corners much better so all the rest were made that way.
My mom helped me out and pre-assembled the rest of the pom poms. We didn't do the last step of poofing them out since they would have taken up way too much space. My mom and mother-in-law helped do the rest on the day of the party. I believe we got a total of 18 pom poms out of the paper I had, and they all fit nicely into a small grocery bag before they were poofed.

Here is a sneak peak at what they looked like on party day.
Along with the tissue paper, all of Baby Boo's birthday gifts arrived during the week too. I didn't go overboard with those since A. She is a 1 year old and doesn't care, B. I was already going overboard with the party itself, and C. We have so many freakin' toys everywhere that I didn't want to get anything too big.
What did I get her?
Well, we love Sandra Boynton books here at our house so I got several of those. I bought 3 different multi packs which are a lot cheaper than buying the books individually. In those packs are:
- The Going to Bed Book
- Horns to Toes
- But Not the Hippopotamus
- Opposites
- Barnyard Dance!
- Pajama Time!
- Oh My Oh My Oh Dinosaurs!
- What's Wrong, Little Pookie?
- Let's Dance, Little Pookie
- Night-Night, Little Pookie
- Little Pookie
She also got a set of Melissa and Doug brand wooden blocks and a couple of wooden puzzles:


I also bought her a beautiful wooden chest to keep her blocks in:
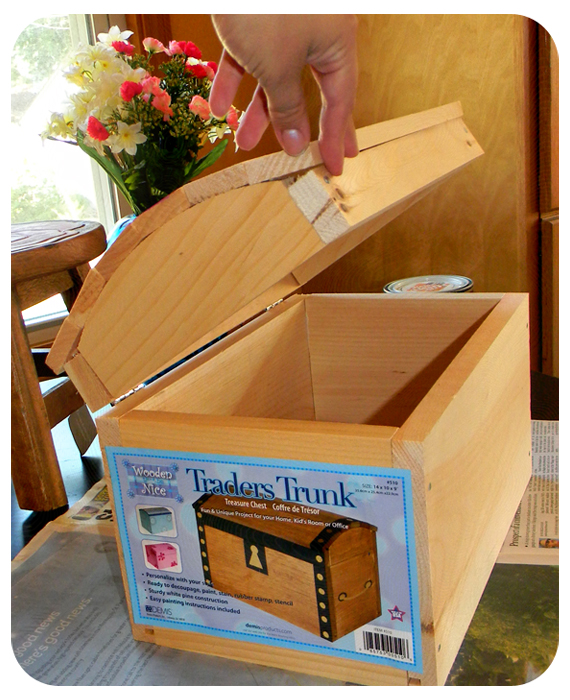


She added the hardware on the inside to keep it from slamming shut and wearing on the hinges.
Everything was wrapped on the cheap with random yellow crepe paper from a party long long ago, and brown paper that was part of some packaging. So by cheap, I mean free - awesome! It didn't look half bad though:


The next project I did was inspired from something I had pinned on Pinterest a while back. It is a party garland made up of monthly photos of the birthday child. Here is the original photo of inspiration that I found on Pinterest:

It originally came from this cute blog called The Macs.
I loved the idea of showing off the party guests how Baby Boo has changed, and I love that it isn't the predictable poster of photos too. So It got to work on creating my own. First I compiled the photos and edited them all to be black and white just for the sake of continuity:


The last project I did that week was also inspired from Pinterest:
Originally from Striving to be More blog.


Cute huh!?!
That about sums it up for the preceding birthday week. I had done pretty much everything I could ahead of time. Of course the food itself and setting up the party would have to wait for that weekend.
That week was a busy one, but the upcoming weekend would be even more hectic. . . but that's a post for tomorrow.
No comments:
Post a Comment
I'd love to hear from you!